Rules to connect to instances from an instance with the same security group
To allow instances that are associated with the same security group to communicate with each other, you must explicitly add rules for this.
The following table describes the inbound rule for a security group that enables associated instances to communicate with each other. The rule allows all types of traffic.
Protocol type
Protocol number
Ports
Source IP
-1 (All)
-1 (All)
-1 (All)
The ID of the security group
Method 1 - use the same keys on the servers:
Convert the keys to openssh format and upload the private keys to the servers. When you ssh to the destination host, specify the private key file:
ssh -i mykey.pem private.ip.of.other.server
Method 2 - Create new keys
On each server run:
ssh-keygen
Hit enter enter enter. You'll have two files:
.ssh/id_rsa
.ssh/id_rsa.pub
On Server A, cat and copy to clipboard the public key:
cat ~/.ssh/id_rsa.pub
[select and copy to your clipboard]
ssh into Server B, and append the contents of that to the it's authorized_keys file:
cat >> ~/.ssh/authorized_keys
[paste your clipboard contents]
[ctrl+d to exit]
How to properly allow all connections from specific IP address?
"All connections" means don't match tcp on your specific IP allow rule!
Just remove -p tcp and you'll have ping (ICMP) and all the other IP protocol stuff allowed.
Also please note that the OUTPUT rule here is not useful. With the first rule you allow tcp to 192.168.0.45, with the second one you allow anything to anybody. So the first one has no effect!
In order to get what you want edit the input rule:
iptables -A INPUT -s 192.168.0.45/32 -j ACCEPT
And remove the OUTPUT rule you made for 192.168.0.45.
<b>sibling method:</b> <div> <div class="sibling-hover">hover over me</div> <div>I do nothing</div> <div>I do nothing</div> <div class="sibling-highlight">I get highlighted</div> </div> <b>child method:</b> <div id="parent"> <div>hover over me</div> <div>hover over me</div> <div>hover over me</div> <div class="parent-highlight">I get highlighted</div> </div>
You cannot match scheme http:// in RewriteCond %{HTTP_HOST}.
You can use this rule:
RewriteEngine On

RewriteCond %{HTTP_HOST} !^www\.domain\.com$ [NC]
RewriteRule ^ https://www.domain.com%{REQUEST_URI} [R=302,L]
You can use the RedirectPermanent directive to redirect the client to your new URL.

Just create a very simple VirtualHost for the old domain in which you redirect it to the new domain:
<VirtualHost *:80>
    ServerName xy.example.com
    RedirectPermanent / http://abc.example.com/
    # optionally add an AccessLog directive for
    # logging the requests and do some statistics
</VirtualHost>
A source map is a .map file in JSON format that gets generated when your Sass files are compiled into CSS. It contains information that links each line of your CSS file (the output) to the corresponding line in its SCSS source file (the input).
This means when your CSS is compiled, you’ll see a comment like the following at the end of your compiled CSS file:
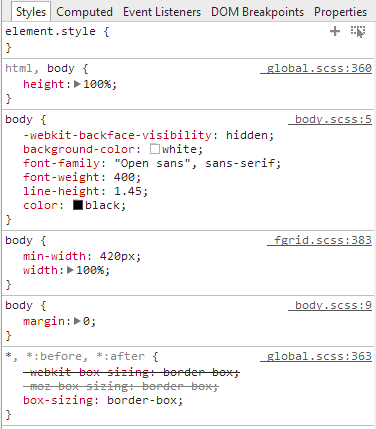
When debugging a web page using Chrome’s developer tools using source maps, the styles panel will show which Sass partial your CSS came from instead of pointing to the CSS file. Meaning, instead of showing the source as style.css, it will show it as _buttons.scss.
In the example in the screenshot below, the styles for the body element come from a partial called _body.scss.
When inspecting, I would like to know where I have defined the color: black portion in this.
To get this information, I could perform one of the following actions to inspect further:
Press CTRL and click on the word color. It will open the appropriate partial in the sources tab and place the cursor in the exact line where the style is defined. In this case, the color is defined in a variable called $black.
Press CTRL and click on the word black. It will open _colors.scss in the sources tab, where the value for the variable $black is defined. In case the color black was coming from a mixin instead of a variable, CTRL + clicking on it will open the file where the mixin is defined. Click the image below to view an animated GIF that shows a demonstration of how this might look.
Using source maps with Workspaces allows you to edit and save changes from within Chrome’s developer tools. If sass --watch is running, it will detect the change and recompile the CSS. The browser will then automatically reload this new CSS.
The instructions and code above will work on Apache. If they are not working there is another way that may work for you. If the above code did not seem to work, remove it from your .htaccess file and try this one instead...
There is no mod_gzip for Apache 2.2x, as it is an Apache 1.3x module. Apache 2.2x has a only mod_deflate. GZip is the same DEFLATE plus a checksum and header/footer. As you can see here, Deflate is faster.
mod_deflate module is shipped with Apache, but in order to use it, you should enable one in your httpd.conf file (it is initially commented out):
The mod_deflate module provides the DEFLATE output filter that allows the output from your server to be compressed before being sent to the client over the network. mod_deflate is the replacement of mod_gzip which was used with an older version of Apache.
ENABLE GZIP MODULE IN APACHE
By default, a mod_deflate module is enabled in Apache. To make sure that it is enabled, check following line in Apache configuration file.
LoadModule deflate_module modules/mod_deflate.so
CONFIGURE GZIP COMPRESSION
Now edit your apache configuration and add the extensions you want to compress.
Add the following configuration in Apache Virtual Host to enable gzip compression for your website. You can also add this code in website's .htaccess file in the site root.
nce a writable stream is closed, it cannot accept anymore data (see the documentation): this is why on the first execution your code will work, and on the second you’ll have thewrite after enderror.
Just create a new gunzip stream for each request:
http.get(url, function(req) {
   var gunzip = zlib.createGzip();
   req.pipe(gunzip);

   gunzip.on('data', function (data) {
     decoder.decode(data);
   });

   gunzip.on('end', function() {
     decoder.result();
   });

});
This article describes an experiment that shows why using the SharedMaterial module in all Angular modules is a bad idea that leads to an increased bundle size.
In this blog post, I will talk about a mistake I have made and have seen many developers doing it as well, which is a shared Material Module. I am sure if you used Angular Material, you still have a SharedMaterial Module in your project, time to remove it.
I am working on a new project which has many modules, and it has more than 20k Lines of Code, and I was working on making some modules as Lazy Loaded modules. I realized we are using the SharedMaterial module in all modules. First, I thought its ok, but I tried to do an experiment which proved its a bad idea.
In my last project where we had our custom components like Grid, Tables, Forms and I did ended up using a big Shared Material Module, as all the components were written on top of Angular Material Component. And now it’s time to prove myself wrong that it was not a good approach.
Let’s create a new App, and we will cover what’s wrong with this approach and how it increases the bundle size. We will be using webpack-bundle-analyzer to check the bundle size. Run the below command to create a new App. Make sure you are using the latest Angular CLI
ng new demoapp
next install webpack-bundle-analyzer using the below command
The above command opens a page, as shown in the image above.
Now, let’s add Angular Material using the below command:
ng add @angular/material
Run the npm run analyze command again and see the main bundle size. It's already increased by around 70 KB without using even a single component from Angular Material.
After Adding Angular Material 1.2
Now let’s add 2 modules employee and department, respectively, using the below command. We will not lazy load them for the first example.
ng g m employee --routing --module app
ng g c employee --export true
ng g m department --routing --module app
ng g c department --export true
Open app.component.html and replace the default template data with
If we analyze the bundle again at this point as we hardly have any code, there is a very small change in size, and it has reduced as the default template contains lots of markups and CSS.
After adding modules 1.3
Now let’s add some code in both the component, we will copy some code from Material documentation.
Add the below code into department and employee component respectively
<mat-accordion><mat-expansion-panel><mat-expansion-panel-header><mat-panel-title>
Personal data
</mat-panel-title><mat-panel-description>
Type your name and age
</mat-panel-description></mat-expansion-panel-header><mat-form-field><inputmatInput></mat-form-field><mat-form-field><inputmatInputtype="number"min="1"></mat-form-field></mat-expansion-panel><mat-expansion-panel(opened)="panelOpenState = true"(closed)="panelOpenState = false"><mat-expansion-panel-header><mat-panel-title>
Self aware panel
</mat-panel-title><mat-panel-description>
Currently I am {{panelOpenState ? 'open' : 'closed'}}
</mat-panel-description></mat-expansion-panel-header><p>I'm visible because I am open</p></mat-expansion-panel></mat-accordion>
One more change is needed in department.component.ts add the below property :
panelOpenState =false;
Now, we need to add some Material module into our employee, and department module as well to avoid the build error, and this is where most of us decide to create a SharedMaterial module like one below.
Now run the analyzer again and check the bundle size. After lazy loading, the bundle size should be reduced, but it increased by around 70KB.
After lazy loading 1.5
Now, let’s remove the Shared Material module and import only the modules which are needed. In employee.module.ts import MatFormFieldModule and MatSelectModule and in department.module.ts import MatExpansionModule and MatFormFieldModule delete the shared module and run the command to analyze the bundle size. In this example, we save around 40KB.
I did a similar experiment in my current project, and the bundle size was reduced by around 200KB, remember when it comes to the web every single KB matters. So, I would suggest and try in your app refactor and share your experience.