Async Pipe all the things!

 Async Pipe all the things!. Quick tutorial of how you can easily… | by joaquin cid | Medium


Never .subscribe() again, | async instead

When dealing with Observables in Angular we need to subscribe to them to unwrap the data stream and do what we need to do with each emitted value.

The most common way to this is to:

And on our template:

This pattern requires you to remember to unsubscribe on the ngOnDestroy event to avoid memory leaks and undesired behavior on your app.

You can simplify this by using the async pipe, here’s how it looks like now:

And the template:

Now, the | async is subscribing for us on the template and not only it does that, ¡it automatically unsubscribes for us on the ngOnDestroy event!

How async pipe works

async pipe receives the Observable we define on the template, subscribes to it, and every time it receives a new emission of data it triggers the ChangeDetection cycle to update the view accordingly.

More important, async pipe implements the ngOnDestroy event and unsubscribes from your observable.

You can take a look that the source code here:

Goodbye .unsubscribe()

So now that we know this we can kiss .unsubscribe() goodbye!

If you are wondering how to subscribe to an Observable that you don’t actually want to display data on the template or it doesn’t stream any data, here’s how you can do it.

Let’s consider a FormGroup to which we want to perform an operation every time its value changes.

Instead of subscribing to it, we can | async to it inside an ng-container. This way we wont need to subscribe and unsubscribe to the Observable without also displaying any data in the page.

Conclusion

We’ve learned how to use the async pipe to subscribe to any Observable on Angular, and how this eliminates the need to unsubscribe from it.


How To Open A Port In CentOS 7 With Firewalld

 How To Open A Port In CentOS 7 With Firewalld (rootusers.com)


Open Specific Port

Opening a port in firewalld is fairly straightforward, in the below example we allow traffic in from any source IP address to TCP port 100. First we modify the persistent configuration, then we reload firewall-cmd to load this change into the running configuration.

[root@centos7 ~]# firewall-cmd --permanent --add-port=100/tcp
success
[root@centos7 ~]# firewall-cmd --reload
success

If the --permanent flag is not specified, this will only change the running configuration but will not be saved.

We can check the ports that are opened in the current default zone with ‘--list-ports’.

[root@centos7 ~]# firewall-cmd --list-ports
100/tcp

As expected we see that TCP port 100 is open.

Should we wish to remove a port, we can use ‘--remove-port=’ instead.

We can also open a range of ports in the same way.

[root@centos7 ~]# firewall-cmd --permanent --add-port=200-300/tcp
success

Open Predefined Service

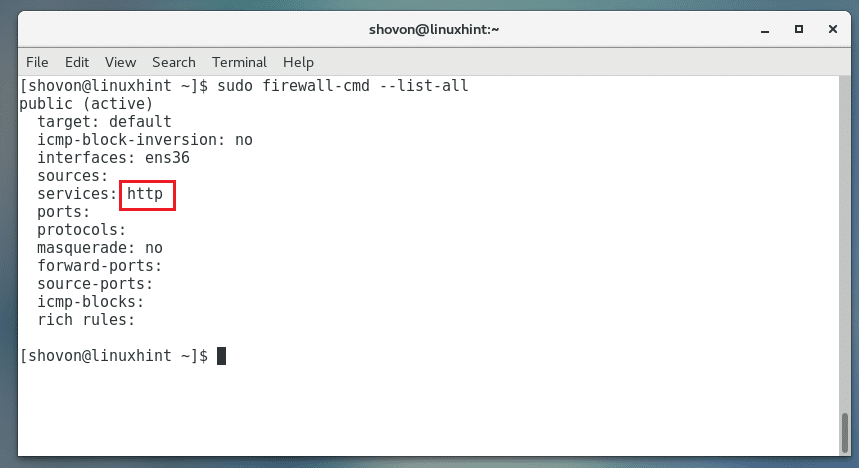
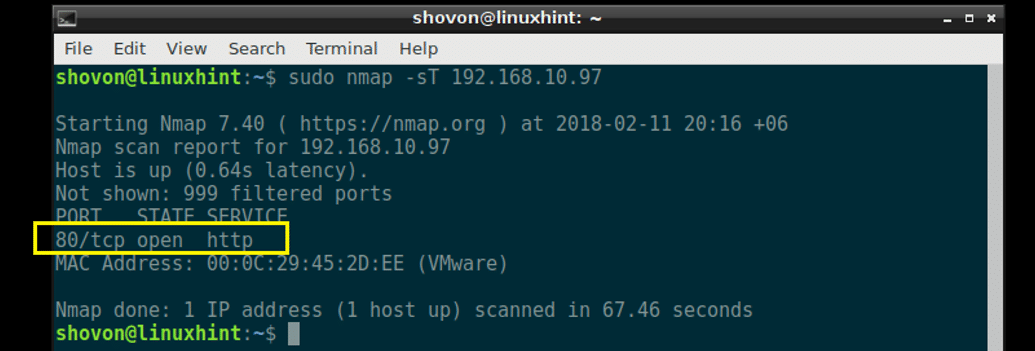
Rather than manually specifying a port number to allow through the firewall, we can make use of a bunch of predefined services which may be easier. For example instead of opening TCP port 80, we can use the ‘http’ service.

[root@centos7 ~]# firewall-cmd --permanent --add-service=http
success
[root@centos7 ~]# firewall-cmd --reload
success

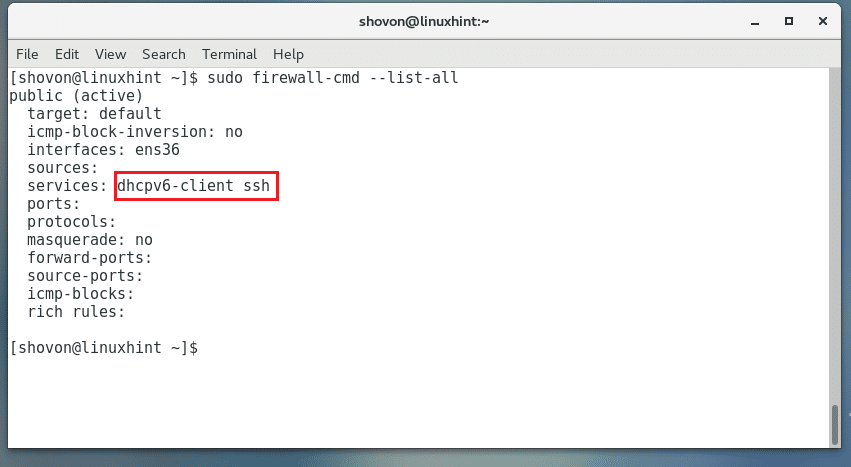
Now if we list the services that are accepted through the firewall, we will see http listed along with ssh and dhcpv6-client, which are allowed through by default.

[root@centos7 ~]# firewall-cmd --list-services
dhcpv6-client http ssh

This is a predefined service and can be found as an XML file in the /usr/lib/firewalld/services/ directory. Here’s what the http service we just used looks like.

[root@centos7 ~]# cat /usr/lib/firewalld/services/http.xml
<?xml version="1.0" encoding="utf-8"?>
<service>
  <short>WWW (HTTP)</short>
  <description>HTTP is the protocol used to serve Web pages. If you plan to make your Web server publicly available, enable this option. This option is not required for viewing pages locally or developing Web pages.</description>
  <port protocol="tcp" port="80"/>
</service>

We can create custom services by copying one of these into the /etc/firewalld/services/ directory and then customizing it. The services in the /usr/lib/firewalld/services/ directory should NOT be modified, changes should be copied into /etc/firewalld/services/ followed by a reload of firewall-cmd to pick up the changes.

Services Or Manual Ports?

Why would we want to use services if we can just specify the port? Modules can be specified in a service, for example samba.xml loads the module “nf_conntrack_netbios_ns” for us when it’s enabled, along with four different ports which is a lot easier than doing all of this ourselves as we don’t need to memorize all of the ports required for a service.

Still not a fan of firewalld? Don’t worry, you can always install ifconfig in CentOS 7 instead, however note that this is considered deprecated.

AWS: SMS text message-based MFA

 Using multi-factor authentication (MFA) in AWS - AWS Identity and Access Management (amazon.com)

SMS text message-based MFA. A type of MFA in which the IAM user settings include the phone number of the user's SMS-compatible mobile device. When the user signs in, AWS sends a six-digit numeric code by SMS text message to the user's mobile device. The user is required to type that code on a second webpage during sign-in. Note that SMS-based MFA is available only for IAM users. You cannot use this type of MFA with the AWS account root user. For more information about enabling SMS text messaging-based MFA, see PREVIEW – Enabling SMS text message MFA devices.


Note

AWS will soon end support for SMS multi-factor authentication (MFA). We are not allowing new customers to preview this feature. We recommend that existing customers switch to one of the following alternative methods of MFA: virtual (software-based) MFA deviceU2F security key, or hardware MFA device. You can view users in your account with an assigned SMS MFA device. To do so, go to the IAM console, choose Users from the navigation pane, and look for users with SMS in the MFA column of the table.

Double question mark in Typescript & Javascript

 Double question mark in Typescript & Javascript | Nullish Coalescing (??) Operator (shareablecode.com)


Usage of ?? Sign in JavaScript and TypeScript

It returns second parameter when first parameter happens to be undefined or null. 

const value = firstParam ?? secondParam;

What's the difference between ?? and || in JavaScript / TypeScript

A common approach to achieve similar thing we use:

const value = firstParam || secondParam;

But problem is logical operator evaluates false value as well, which is not null or undefined

const foo = false
const baz = foo || 'default value'; // returns 'default value'
const value = foo ?? 'default value'// returns false;

TypeError: Cannot read property 'split' of undefined at defaultUrlMatcher

 javascript - Angular2 v3 component router: TypeError: Cannot read property 'split' of undefined - Stack Overflow


I figured out what was going on. In case anyone else hits a similar issue, the problem in this case was in WorkspaceRoutes.

export const WorkspaceRoutes: RouterConfig = [
  {path: 'workspace/:id', component: WorkspaceRootComponent},
  {children: [    // this should not be the start of a new object
    {path: 'projects', component: WorkspaceDashboardComponent},
    {path: 'newproject', component: ProjectNewComponent},
    {path: '', redirectTo: 'projects', terminal: true},
  ]}
];

Should be

export const WorkspaceRoutes: RouterConfig = [
  {path: 'workspace/:id', 
  component: WorkspaceRootComponent,
  children: [
    {path: 'projects', component: WorkspaceDashboardComponent},
    {path: 'newproject', component: ProjectNewComponent},
    {path: '', redirectTo: 'projects', terminal: true},
  ]}
];

The children item of WorkspaceRootComponent was not under that item, but on the same level.

replaceUrl: true

 Using "replaceUrl" In Order To Honor The Back-Button While Chaining Absolute Redirects In Angular 7.2.13 (bennadel.com)


this.router.navigateByUrl(

this.redirectTo,

// By replacing the current URL in the history, we keep the Browser's Back

// Button behavior in tact. This will allow the user to easily navigate back

// to the previous URL without getting caught in a redirect.

{

replaceUrl: true

}

);

Create a new branch from the current branch

 Git create new branch from master or current branch (mytrashcode.com)


To create a GIT branch from the current branch, you can use three commands sequentially and expect git to create a new branch for you.

git checkout master
git pull
git checkout <already_exisiting_branch>
git checkout -b <New_branch_name>

How this works :

  • It will first take you to master and pull the latest changes for all the branches of the repo.
  • Then move to an existing branch
  • Then creates a new branch from the existing branch with all the changes of the original branch.

There are few other ways you can create a branch. One is from a single commit and the other one is from any release tag.

How To Open Port 80 on CentOS

 How To Open Port 80 on CentOS – Linux Hint


How To Open Port 80 on CentOS

If you’re planning to host websites on CentOS 7, then you might install a web server software such as Apache or Nginx. A web server like Apache by default works on port 80. That is if you go to the IP address or hostname or domain name of your server from a web browser, then the web server should send you a web page. In a CentOS 7 server, many services like that should be installed. Like the web server works on port 80, a DNS server works on port 53, SSH server works on port 22, a MySQL server works on port 3306 and so on. But you don’t want others to connect to these services. If someone gains access to your SSH server, then he/she may be able to control your server, like stop some services, install some new services, change your password and many unexpected things can happen. That is why a firewall program is used to allow outsiders to connect to specific port and block others. For a web server, the port is 80.

In this article, I will show you how to open port 80 and block all the other ports on CentOS 7 with firewalld. Let’s get started.

Installing a Web Server

In this section, I will show you how to install a web server on CentOS 7. I included this section so that you can have a real life experience on what I am talking about.

The most widely used web server software is Apache. Apache is available on the official package repository of CentOS 7.


o install Apache web server, run the following command:

sudo yum install httpd

03:08 of 07:14Volume 0%
04:13
07:14
 

Press ‘y’ and then press <Enter> to continue.

Apache web server should be installed.

Now run the following command to check whether Apache HTTP server is running or not:

sudo systemctl status httpd

As you can see from the screenshot below, the Apache HTTP server is not running.

You can start Apache HTTP server with the following command:

sudo systemctl start httpd

You will want the Apache HTTP server to start automatically on system boot. You can add Apache HTTP server to the startup with the following command:

sudo systemctl enable httpd

Apache HTTP server is added to the startup.

Now open up a web browser and go to http://localhost

You should see the following page as shown in the screenshot below.


Checking for Open Ports with nmap

First check the IP address of your CentOS 7 server with the following command:

ip a

As you can see from the screenshot below, the IP address of my CentOS 7 server is 192.168.10.97

You can check for all the open ports with nmap utility from another computer as follows:

nmap -sT 192.168.10.97

As you can see, right now, only the port 22 is open. What we are interested in is opening only port 80 and closing others.

Opening Port 80 and Closing Others

First check all the allowed services with the following command:

sudo firewall-cmd --list-all

As you can see I have dhcpv6-client and ssh services allowed from outside. You may have more or less services allowed.

Now you have to disable them one by one.

You can remove the ssh service with the following command:

sudo firewall-cmd --remove-service=ssh --permanent


You can remove the dhcpv6-client service with the following command:

sudo firewall-cmd --remove-service=dhcpv6-client  --permanent

Now add HTTP service or port 80 with the following command:

sudo firewall-cmd --add-service=http --permanent

Once you’re done, restart firewalld with the following command:

sudo firewall-cmd --reload

Now if you check the firewalld services again:

sudo firewall-cmd --list-all

You should see only http service allowed as marked in the screenshot below.

Now you may do a port scan with nmap from another computer:

sudo nmap -sT 192.168.10.97

You should be able to see only port 80 open as shown in the screenshot below.

You can also test whether you can access the web server if you open up a browser and type in the web server’s IP address.

I can access the web server from a browser as you can see from the screenshot below.

So that’s how you open port 80 and block every other ports on CentOS 7. Thanks for reading this article.

Cold Turkey Blocker

 https://superuser.com/questions/1366153/how-to-get-rid-of-cold-turkey-website-blocker-get-around-the-block Very old question, but still wan...