How to Extend LVM Partition with lvextend Command in Linux

 https://www.linuxtechi.com/extend-lvm-partitions/

In this post, we will show you how to extend the size of lvm partition in linux with lvextend command on the fly.

Resizing the file system size is an important task of Linux admin’s profile. In Linux , LVM(Logical Volume Manager) provides the facility to increase and reduce the file system size. One of benefit of using lvm partition is that we can increase or decrease its size on the fly without any downtime. It is recommended to have lvm partitions in production Linux or UNIX servers.

Scenario : Suppose we have a LVM partition(/home) and running out of space and want to extend or increase file system size. So, to increase the size of the file system first we must see whether in volume group has free space or not. If the volume group has free space then use the below steps :

Step1) View Disk Usage of File System

Run df command followed by the file system to view total ,used and available disk space

[root@cloud home]# df -h /home/
 Filesystem            Size  Used Avail Use% Mounted on
 /dev/mapper/vg_cloud-LogVol00
                       9.7G  9.2G     0 100% /home

As we can see above, /home is 100 % utilized.

Step 2) Check Free Space in Volume Group

To display volume group details, execute the vgdisplay or vgs command followed by volume group name,

# vgdisplay <Volume-Group-Name>

or

# vgs <Volume-Group-Name>

[root@cloud home]# vgdisplay vg_cloud
   --- Volume group ---
 VG Name                      vg_cloud
 System ID
 Format                       lvm2
 Metadata Areas               1
 Metadata Sequence No         4
 VG Access                    read/write
 VG Status                    resizable
 MAX LV                       0
 Cur LV                       3
 Open LV                      3
 Max PV                       0
 Cur PV                       1
 Act PV                       1
 VG Size                      27.01 GiB
 PE Size                      4.00 MiB
 Total PE                     6915
 Alloc PE / Size              5256 / 20.53 GiB
 Free  PE / Size              1659 / 6.48 GiB
 VG UUID                      1R89GB-mIP2-7Hgu-zEVR-5H02-7GdB-Ufj7R4

Output above confirms that we 6.48 GB free space in the volume group (vg_cloud)

Step 3) Increase the size with lvextend Command 

Run below lvextend command to extend the file system,

[root@cloud ~]# lvextend -L +2G /dev/mapper/vg_cloud-LogVol00
     Extending logical volume LogVol00 to 11.77 GiB
     Logical volume LogVol00 successfully resized

Above command will extend the file system size by 2GB. You can also specify the size in MB , just replace G with M.

If you want all free space available in volume group to be added to file system then run

[root@cloud ~]# lvextend -l +100%FREE /dev/mapper/vg_cloud-LogVol00

Now, run the resize2fs command to implement above size to file system.

[root@cloud ~]# resize2fs /dev/mapper/vg_cloud-LogVol00

Note: You can also extend the file system size using single lvextnd command by adding -r at end, example is shown below

[root@cloud ~] lvextend -L +2G /dev/mapper/vg_cloud-LogVol00 -r

After running above command, you don’t need to resize2fs command.

Step 4) Verify File system Size after Extension

Re-run the df -h command followed by /home file system, now we can see that file system has been extended by 2 GB, before the extension size was 10 GB

[root@cloud ~]# df -h /home/
 Filesystem            Size  Used Avail Use% Mounted on
 /dev/mapper/vg_cloud-LogVol00
                        12G  9.2G  1.9G  84% /home

That’s all from this post, I hope found it informative. Kindly do post your queries and feedback in below comments sections.


 1023  sudo lsblk

 1024  sudo pvs

 1025  growpart -h

 1026  sudo yum -y install cloud-utils-growpart

 1027  growpart -h

 1028  sudo pvs

 1029  sudo growpart /dev/sda 2

 1030  sudo lsblk

 1031  dh -H

 1032  df -H

 1033  sudo lsblk

 1034  df -hT

 1035  sudo xfs_growfs -h

 1036  sudo xfs_growfs -d /

 1037  df -hT

 1038  sudo lsblk

 1039  sudo growpart /dev/sda2 1

 1040  history

 1041  sudo pvresize /dev/sda2

 1042  dh -h

 1043  df -h

 1044  sudo pvs

 1045  sudo lsklb

 1046  sudo lsblk

 1047  sudo vgs

 1048  df -h

 1049  sudo lvextend -r -l +100%FREE /dev/mapper/centos-root

 1050  df -hT | grep mapper

 1051  sudo xfs_growfs /

 1052  df -hT

How to increase the WPGraphQL query limit

 https://www.devtwins.com/blog/wpgraphql-increase-post-limit

WPGraphQL is a wonderful plugin that enables GraphQL querying of WordPress content, but unfortunately it limits the amount of posts you can query at a time to 100 by default.

In this post, we are going to show you the best way to increase this limit.

The main solution originally presented by Jason Bahl (the creator of WPGraphQL) is to paste this function into the bottom of your WordPress theme's functions.php file:

add_filter( 'graphql_connection_max_query_amount', function( $amount, $source, $args, $context, $info ) {
if(current_user_can( 'manage_options')) {
$amount = 1000; // increase post limit to 1000
}
return $amount;
}, 10, 5 );
// not the ideal solution. For best solution, see below.

However, an issue that users have noticed with this solution is that although it works inside of the GraphiQL plugin (inside of the WordPress instance), the 100 post limit often remains for outside services querying for your WordPress content (such as Vercel, Netlify, or Heroku).

The problem is with the statement: if(current_user_can( 'manage_options'). Outside queries will not satisfy this condition, so the new $amount will not be set.

So the best solution is to remove the if statement and just set the $amount directly no matter what:

// best solution
add_filter( 'graphql_connection_max_query_amount', function( $amount, $source, $args, $context, $info ) {
$amount = 1000; // increase post limit to 1000
return $amount;
}, 10, 5 );

Disclaimer: fetching too many things in one request can cause slowdowns for the client and possibly server performance issues as well. There's no magic number to what the right amount of posts to return for optimal performance, but the more data the server is processing and the more the client is downloading, the worse the performance tends to be. Sometimes you can get better performance from more, but smaller, requests.

Additional Notes

Make sure you paste the function above into the bottom of your wp-content/themes/[theme_name]/functions.php file.

If you have multiple themes and aren't sure which theme you're currently using, you can go to Appearance --> Themes and it will show you the currently active theme.

Understand WordPress Filesystem Permissions

 https://docs.bitnami.com/google/apps/wordpress/administration/understand-file-permissions/

Bitnami applies the following default permissions to WordPress files and directories:

  • Files and directories are owned by user bitnami and group daemon.
  • Directories are configured with permissions 775 by default.
  • Files are configured with permissions 664 by default.
  • The wp-config.php file is configured with permissions 640.

If permissions are wrong, use the chmod or chown commands to restore them to their initial state. For example, if TARGET is the WordPress application folder:

sudo chown -R bitnami:daemon TARGET
sudo find TARGET -type d -exec chmod 775 {} \;
sudo find TARGET -type f -exec chmod 664 {} \;
sudo chmod 640 TARGET/wp-config.php

Watch the following video to learn more:

How to Check Disk Space on Linux from the Command Line

 https://www.linuxfoundation.org/blog/blog/classic-sysadmin-how-to-check-disk-space-on-linux-from-the-command-line

Quick question: How much space do you have left on your drives? A little or a lot? Follow up question: Do you know how to find out? If you happen to use a GUI desktop (e.g., GNOME, KDE, Mate, Pantheon, etc.), the task is probably pretty simple. But what if you’re looking at a headless server, with no GUI? Do you need to install tools for the task? The answer is a resounding no. All the necessary bits are already in place to help you find out exactly how much space remains on your drives. In fact, you have two very easy-to-use options at the ready.

In this article, I’ll demonstrate these tools. I’ll be using Elementary OS, which also includes a GUI option, but we’re going to limit ourselves to the command line. The good news is these command-line tools are readily available for every Linux distribution. On my testing system, there are a number of attached drives (both internal and external). The commands used are agnostic to where a drive is plugged in; they only care that the drive is mounted and visible to the operating system.

With that said, let’s take a look at the tools.

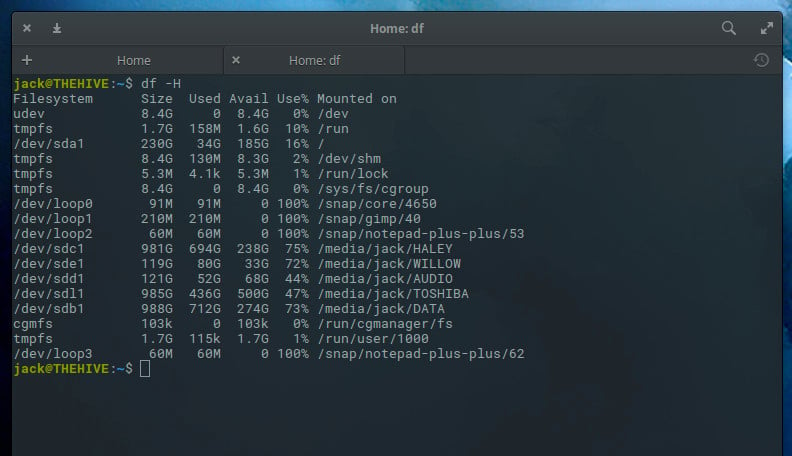
df

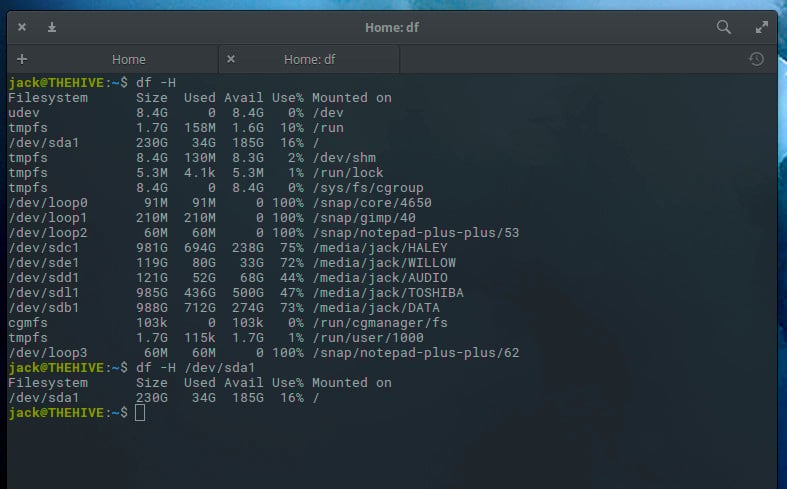
The df command is the tool I first used to discover drive space on Linux, way back in the 1990s. It’s very simple in both usage and reporting. To this day, df is my go-to command for this task. This command has a few switches but, for basic reporting, you really only need one. That command is df -H. The -H switch is for human-readable format. The output of df -H will report how much space is used, available, percentage used, and the mount point of every disk attached to your system (Figure 1).

Figure 1: The output of df -H on my Elementary OS system.

What if your list of drives is exceedingly long and you just want to view the space used on a single drive? With df, that is possible. Let’s take a look at how much space has been used up on our primary drive, located at /dev/sda1. To do that, issue the command:

df -H /dev/sda1

The output will be limited to that one drive (Figure 2).

Figure 2: How much space is on one particular drive?

You can also limit the reported fields shown in the df output. Available fields are:

  • source — the file system source

  • size — total number of blocks

  • used — spaced used on a drive

  • avail — space available on a drive

  • pcent — percent of used space, divided by total size

  • target — mount point of a drive

Let’s display the output of all our drives, showing only the size, used, and avail (or availability) fields. The command for this would be:

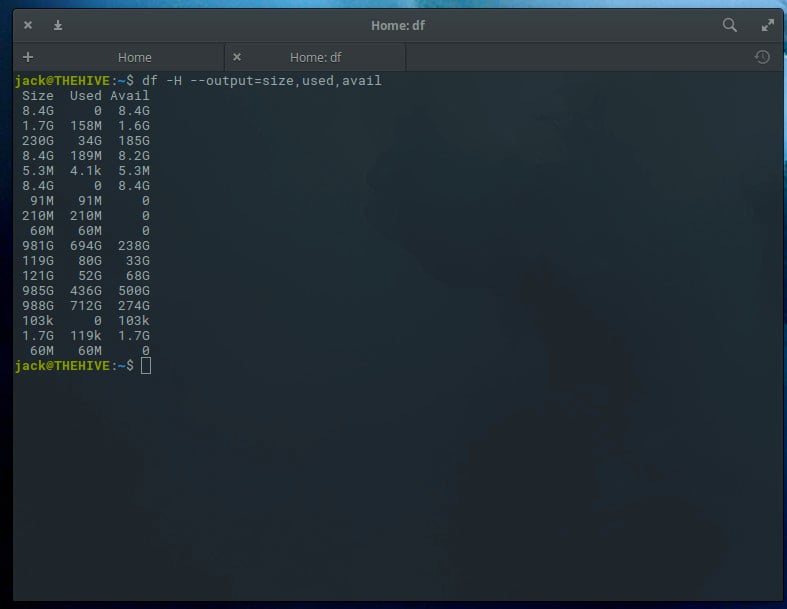
df -H --output=size,used,avail

The output of this command is quite easy to read (Figure 3).

Figure 3: Specifying what output to display for our drives.

The only caveat here is that we don’t know the source of the output, so we’d want to include source like so:

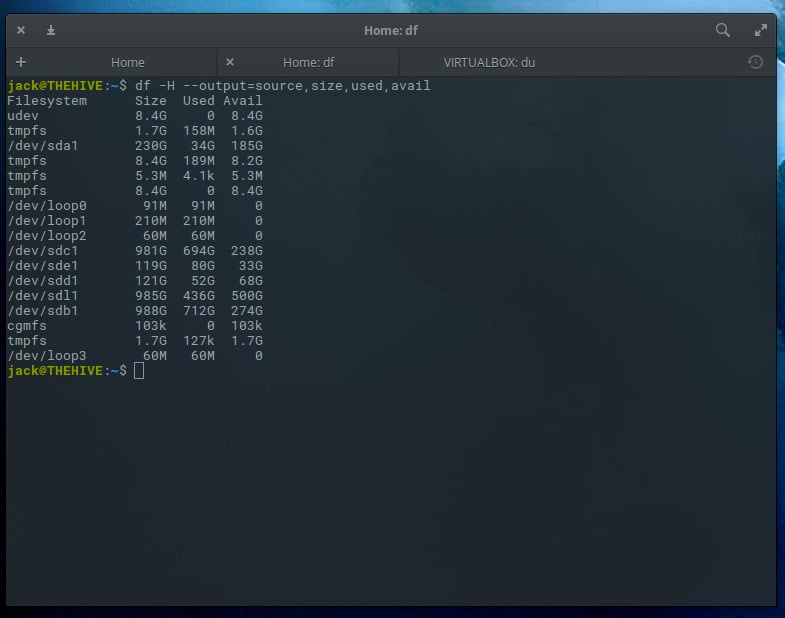
df -H --output=source,size,used,avail

Now the output makes more sense (Figure 4).

Figure 4: We now know the source of our disk usage.

du

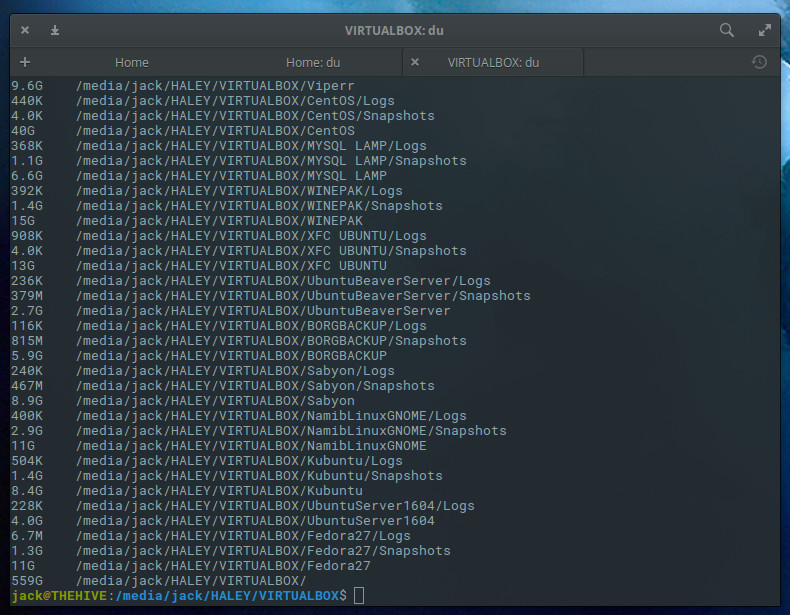
Our next command is du. As you might expect, that stands for disk usage. The du command is quite different to the df command, in that it reports on directories and not drives. Because of this, you’ll want to know the names of directories to be checked. Let’s say I have a directory containing virtual machine files on my machine. That directory is /media/jack/HALEY/VIRTUALBOX. If I want to find out how much space is used by that particular directory, I’d issue the command:

du -h /media/jack/HALEY/VIRTUALBOX

The output of the above command will display the size of every file in the directory (Figure 5).

Figure 5: The output of the du command on a specific directory.

So far, this command isn’t all that helpful. What if we want to know the total usage of a particular directory? Fortunately, du can handle that task. On the same directory, the command would be:

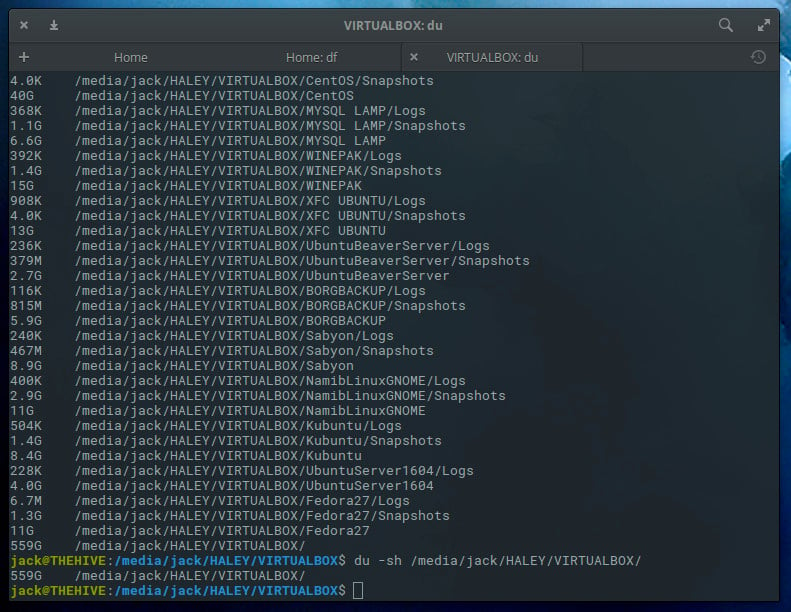
du -sh /media/jack/HALEY/VIRTUALBOX/

Now we know how much total space the files are using up in that directory (Figure 6).

Figure 6: My virtual machine files are using 559GB of space.

You can also use this command to see how much space is being used on all child directories of a parent, like so:

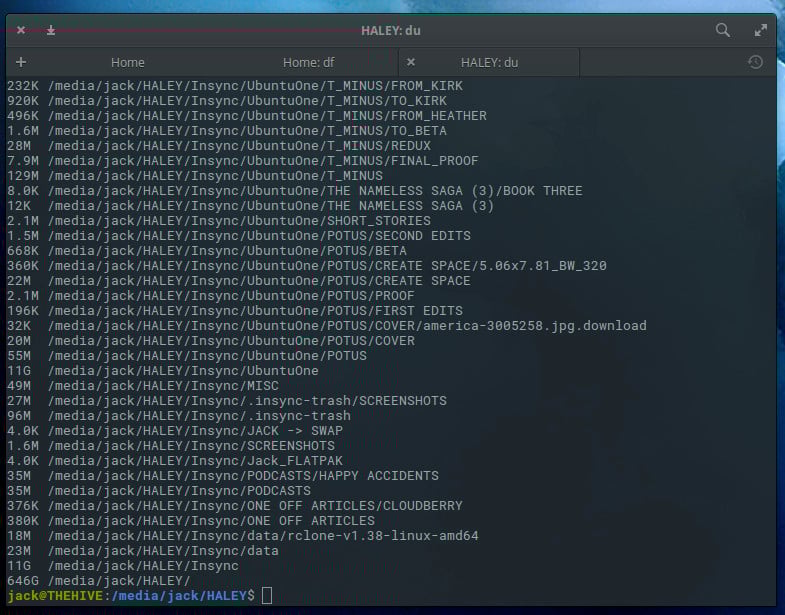
du -h /media/jack/HALEY

The output of this command (Figure 7) is a good way to find out what subdirectories are hogging up space on a drive.

Figure 7: How much space are my subdirectories using?

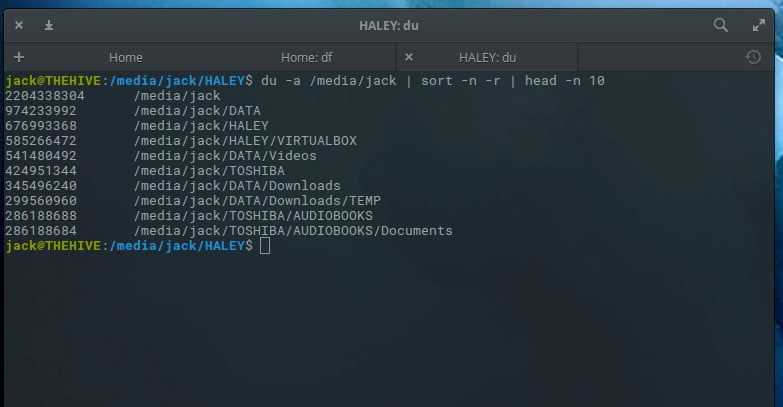
The du command is also a great tool to use in order to see a list of directories that are using the most disk space on your system. The way to do this is by piping the output of du to two other commands: sort and head. The command to find out the top 10 directories eating space on a drive would look something like this:

du -a /media/jack | sort -n -r | head -n 10

The output would list out those directories, from largest to least offender (Figure 8).

Figure 8: Our top ten directories using up space on a drive.

Call parent's function from a child component React js

 https://www.learnbestcoding.com/post/72/call-parent-function-from-child-component-react

To call a parent's function from a child component, pass the function reference to the child component as a prop. Then you can call that parent's function from the child component like props.parentMethodName().

In the example code, we create a parent component named Parent. The Parent component has the method parentFunction that we intend to call from the child component. The parentFunction() accepts a number as an argument and updates the count state variable by calling the setCount method.

Note that we pass the parentFunction() to the child component as a prop. <Child parentFunction={parentFunction}/>

import { useState } from "react"
import Child from "./components/Contact"
export const Parent = () => {
const [count, setCount] = useState<number>()

const parentFunction = (points: number) => {
  setCount(points)
}
return(
    <div>
	<div>
	   <h2>Parent Component</h2><br/>
	   {count && `Received: ${count} points from child`}
	   <Child parentFunction={parentFunction}/>
	</div>
    </div>
 )
}
export default Parent
Calling parents function from child component
Figure 1: Calling parents function from child component

The child component receives the parent's method parentFunction() as a prop. Then we call the parent function with props.parentFunction(points) which executes the parent's function and updates the count state variable.

import { useState } from "react"

interface ChildProps {
  parentFunction: Function
}

const Child = (props: ChildProps) => {
 const [points, setPoints] = useState<number>()
  return(
    <div style={{padding: 30}}>
      <div>
        <h3>Child Component</h3>
        <p>Send : <input value={points} onChange={(e) => setPoints(+e.target.value)}/> points to Parent</p>
        <p style={{textAlign: "center"}}><button onClick={() => props.parentFunction(points)}>Send to parent</button></p>
      </div>
  </div>
  )
 }
 export default Child

How to extend root filesystem using LVM on Linux

 https://computingforgeeks.com/extending-root-filesystem-using-lvm-linux/

https://www.dade2.net/kb/how-to-extend-filesystem-on-linux/

https://docs.aws.amazon.com/AWSEC2/latest/UserGuide/recognize-expanded-volume-linux.html


Welcome to our guide on how to extend root filesystem using LVM on Linux. This will cover both ext4 and XFS filesystem root partition extending. To demonstrate a complete LVM lifecycle, we will perform the following actions:

  • Create an LVM physical volume, volume group, and logical volume.
  • Create an XFS and ext4 file systems on the logical volumes
  • Extend LVM logical volumes ( root and non-root filesystem)

LVM allows you to create, resize or delete partitions on a running system without requiring any reboot. So check the steps below to extend root filesystem using LVM in Linux. You can skip some steps which don’t apply to use.

If you’re not using LVM, check our guide below which covers extending Ext2/3/4 and XFS file systems.

Step 1: Confirm Disk Partitions in Distribution.

Before we can do any extension, let’s just confirm our disk layout / partitioning scheme.

$ sudo lsblk 
NAME          MAJ:MIN RM  SIZE RO TYPE MOUNTPOINT
sr0            11:0    1 1024M  0 rom  
vda           252:0    0   30G  0 disk 
├─vda1        252:1    0    1G  0 part /boot
└─vda2        252:2    0   29G  0 part 
  ├─rhel-root 253:0    0 26.9G  0 lvm  /
  └─rhel-swap 253:1    0  2.1G  0 lvm  [SWAP]

As noted, we have a root filesystem on /dev/vda2 physical volume.

$ sudo pvs
  PV         VG   Fmt  Attr PSize   PFree
  /dev/vda2  rhel lvm2 a--  <29.00g    0 

Step 2: Extend your OS root disk

As shown in step 1, my root filesystem is on a 30GB disk. I’ll grow it to 40GB by extending the virtual disk (VM disk device).

I use KVM virtualization technology, so this guide works for me: How to extend/increase KVM Virtual Machine (VM) disk size

$ sudo lsblk 
 NAME          MAJ:MIN RM  SIZE RO TYPE MOUNTPOINT
 sr0            11:0    1 1024M  0 rom  
 vda           252:0    0   40G  0 disk 
 ├─vda1        252:1    0    1G  0 part /boot
 └─vda2        252:2    0   29G  0 part 
   ├─rhel-root 253:0    0 26.9G  0 lvm  /
   └─rhel-swap 253:1    0  2.1G  0 lvm  [SWAP]

If you’re on a different Virtualization platform, refer to its documentation for how to extend OS disk.

Once the OS block device is resized, ssh to your Linux machine and extend LVM to use newly added disk capacity. The command below will expand the last partition (Partition 2), as shown by 252:2,on the disk (/dev/vda) to the maximum size the disk provides.

Install cloud utils package on the system

For those new to growpart, it is a Linux command line tool used to extend a partition in a partition table to fill available space. This command is provided by cloud utils package.

On Ubuntu / Debian system, run the commands below to install growpart tool.

sudo apt update
sudo apt install cloud-guest-utils

For CentOS server, run

sudo yum -y install cloud-utils-growpart

Help page can be viewed by passing -h argument

$ growpart -h
growpart disk partition
   rewrite partition table so that partition takes up all the space it can
   options:
    -h | --help       print Usage and exit
         --fudge F    if part could be resized, but change would be
                      less than 'F' bytes, do not resize (default: 1048576)
    -N | --dry-run    only report what would be done, show new 'sfdisk -d'
    -v | --verbose    increase verbosity / debug
    -u | --update  R update the the kernel partition table info after growing
                      this requires kernel support and 'partx --update'
                      R is one of:
                       - 'auto'  : [default] update partition if possible
                       - 'force' : try despite sanity checks (fail on failure)
                       - 'off'   : do not attempt
                       - 'on'    : fail if sanity checks indicate no support

   Example:
    - growpart /dev/sda 1
      Resize partition 1 on /dev/sd

Now use growpart to extend your partition. In this example we’re extending partition in disk /dev/vda. Replace 2 and /dev/vda with your correct values.

$ sudo growpart /dev/vda 2
CHANGED: partition=2 start=2099200 old: size=18872320 end=20971520 new: size=60815327,end=62914527

Confirm if the change was successful.

$ sudo lsblk 
 NAME          MAJ:MIN RM  SIZE RO TYPE MOUNTPOINT
 sr0            11:0    1 1024M  0 rom  
 vda           252:0    0   40G  0 disk 
 ├─vda1        252:1    0    1G  0 part /boot
 └─vda2        252:2    0   39G  0 part 
   ├─rhel-root 253:0    0 26.9G  0 lvm  /
   └─rhel-swap 253:1    0  2.1G  0 lvm  [SWAP]

Step 3: Resize root logical volume

Resize physical volume.

$ sudo pvresize /dev/vda2
  Physical volume "/dev/vda2" changed
  1 physical volume(s) resized or updated / 0 physical volume(s) not resized

$ sudo pvs
  PV         VG   Fmt  Attr PSize   PFree 
  /dev/vda2  rhel lvm2 a--  <39.00g 10.00g

Check the size of the volume group configured.

$ sudo vgs
   VG   #PV #LV #SN Attr   VSize   VFree 
   rhel   1   2   0 wz--n- <39.00g 10.00g

Then resize logical volume used by the root file system using the extended volume group:

sudo lvextend -r -l +100%FREE /dev/name-of-volume-group/root

This extends the logical volume to use all available capacity in the volume group. With the + sign the value is added to the actual size of the logical volume.

Command options used:

  • -l – extend or set the logical volume size in units of logical extents
  • -r – Resize underlying filesystem together with the logical volume

Here’s an example of my setup file system extension:

$ df -hT | grep mapper
 /dev/mapper/rhel-root xfs        27G  1.9G   26G   8% /

$ sudo lvextend -r -l +100%FREE /dev/mapper/rhel-root
Size of logical volume rhel/root changed from <26.93 GiB (6893 extents) to <36.93 GiB (9453 extents).
Logical volume rhel/root successfully resized.

If you prefer setting the size to be extended manually, use command option:

-L, --size [+]LogicalVolumeSize[bBsSkKmMgGtTpPeE]

Where size suffix are:

  • M for megabytes
  • G for gigabytes
  • T for terabytes
  • P for petabytes
  • E for exabytes

Without the sign the value is taken as an absolute one.

# Add 20 gigabytes to the current logical volume size
$ sudo lvextend -r -L +20G /dev/name-of-volume-group/root

Step 4: Update changes on the filesystem

Your root filesystem will still show the old size.

$ df -hT | grep mapper
 /dev/mapper/rhel-root xfs        27G  1.9G   26G   8% /

Let’s make the filesystem report the actual size, including extended.

For ext4 filesystem

sudo resize2fs /dev/name-of-volume-group/root

For xfs filesystem

$ sudo xfs_growfs /
 meta-data=/dev/mapper/rhel-root  isize=512    agcount=4, agsize=1764608 blks
          =                       sectsz=512   attr=2, projid32bit=1
          =                       crc=1        finobt=1, sparse=1, rmapbt=0
          =                       reflink=1
 data     =                       bsize=4096   blocks=7058432, imaxpct=25
          =                       sunit=0      swidth=0 blks
 naming   =version 2              bsize=4096   ascii-ci=0, ftype=1
 log      =internal log           bsize=4096   blocks=3446, version=2
          =                       sectsz=512   sunit=0 blks, lazy-count=1
 realtime =none                   extsz=4096   blocks=0, rtextents=0
 data blocks changed from 7058432 to 9679872

Recommended Learning Materials for Linux System Administration:

Conclusion

You have learned how to extend root filesystem backed by nfs and ext4 with this how to extend root filesystem using LVM guide. I hope this was helpful and would like to thank you for reading.

Cold Turkey Blocker

 https://superuser.com/questions/1366153/how-to-get-rid-of-cold-turkey-website-blocker-get-around-the-block Very old question, but still wan...