Deactivate All Plugins When Not Able to Access WP-Admin

 https://www.wpbeginner.com/plugins/how-to-deactivate-all-plugins-when-not-able-to-access-wp-admin/

Method 1: Deactivate All WordPress Plugins Using FTP

For this method, you will need to either use an FTP client or the file manager app in your WordPress hosting control panel.

If you haven’t used FTP before, then you may want to see our guide on how to use FTP to upload files to WordPress.

First, you need to connect to your website using an FTP client or the file manager in cPanel. Once connected, you need to navigate to the /wp-content/ folder.

Inside the wp-content folder, you will see a folder called plugins. This is where WordPress stores all plugins installed on your website.
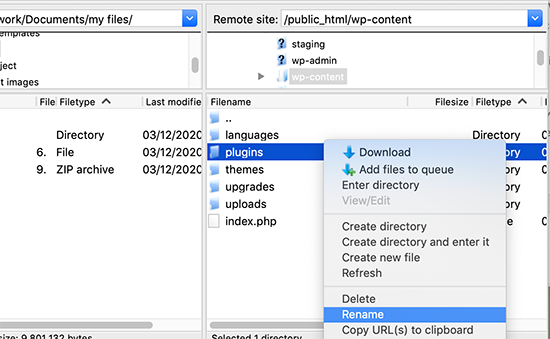
Rename plugins folder

You need to right-click the plugins folder and select ‘Rename’.

Next, change the name of the folder to anything that you like. In our example, we will call it plugins.deactivate.
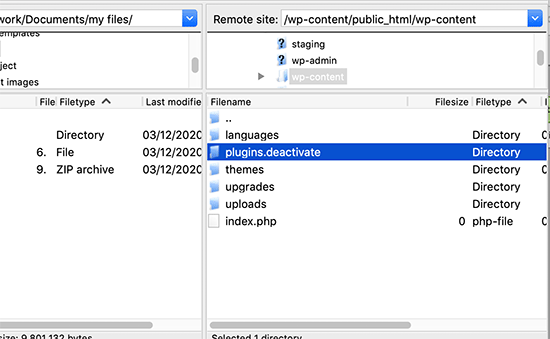
Plugin folder renamed to deactivate all plugins

Once you do this, all of your plugins will be deactivated.

That’s because WordPress looks for a folder called ‘plugins’ to load the plugin files. When it does not find the folder, it automatically disables the active plugins in the database.

Usually, this method is used when you are locked out of your admin area. If the issue was with your plugins, then you should be able to log in to your WordPress admin area.

If you visit the Plugins » Installed Plugins page inside the WordPress admin area, then you will see notifications for all the plugins that have been deactivated.
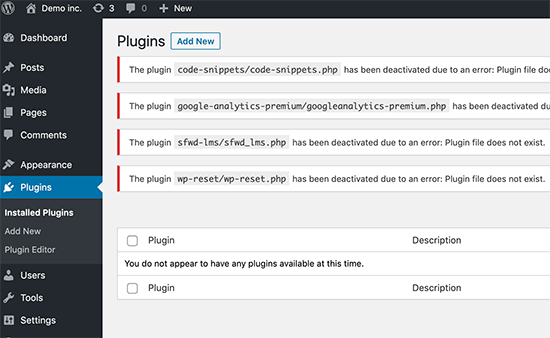
WordPress plugins deactivated

You will also notice that all your plugins have disappeared now. Don’t worry; they are all safe, and you can easily restore them.

Simply switch back to your FTP client and go to the /wp-content/ folder. From here, you need to rename the plugins.deactivate folder back to plugins.

Now, you can go back to the Plugins » Installed Plugins page inside the WordPress admin area and activate one plugin at a time until your site breaks again.

At this point, you will know exactly which plugin caused the issue. You can then delete that plugin’s folder from your site using FTP or ask the plugin author for support.

Method 2: Deactivate All Plugins Using phpMyAdmin

The FTP method is definitely easier, in our opinion. However, you can also deactivate all WordPress plugins using phpMyAdmin.

Important: Before you do anything, please make a complete database backup. This will come in handy if anything goes wrong.

Next, you will need to log in to your web hosting dashboard. In this example, we are showing you a cPanel dashboard. Your hosting account’s dashboard may look different.

You will need to click the ‘phpMyAdmin’ icon under the Databases section.

phpMyAdmin in cPanel

This will launch phpMyAdmin in a new browser window.

You will need to select your WordPress database if it is not already selected. After that, you will be able to see WordPress database tables.
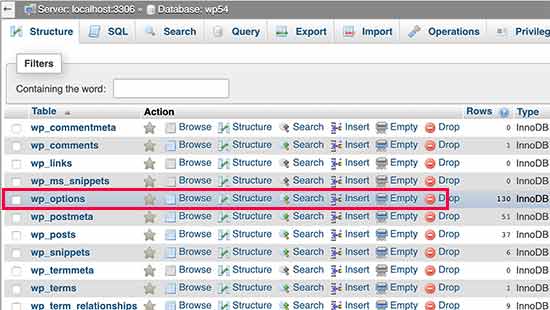
WordPress database tables

As you can see, all tables in the database have wp_ prefix before the table name. Your tables may have a different database prefix.

You need to click on the wp_options table. Inside the wp_options table, you will see rows of different options. Find the option ‘active_plugins’ and then click on the ‘Edit’ link next to it.
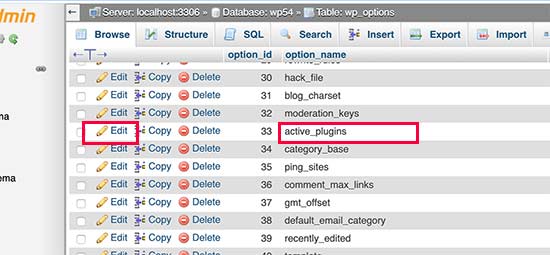
Editing active plugins option

On the next screen, you will need to change the option_value field to a:0:{}.

Then, click the ‘Go’ button to save your changes.
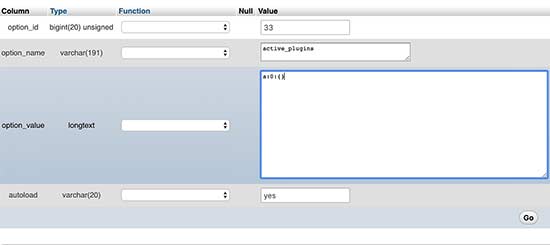
Reset active plugins

You have successfully deactivated all WordPress plugins using phpMyAdmin. If a plugin was stopping you from accessing WordPress admin, then you should be able to log in now.

Running Node.js scripts continuously using forever

https://blog.logrocket.com/running-node-js-scripts-continuously-forever/ 

What is forever?

Forever is an npm module that ensures a Node.js script continuously runs in the background on the server. It’s a helpful CLI tool for the production environment because it helps manage the Node applications and their processes.

NPM Over a Black, Swirling Background

In this article, we will learn how to set up forever with our Node application, as well as learn some important forever commands.

Installing forever

Forever can be used in two ways: with the forever CLI tool and with forever-monitor. The forever-monitor tool can be used to run an application with forever using code. We will see forever-monitor in action later in this article.

To use forever, we need to install it globally:

npm i -g forever

Running a script with forever

Running a script with forever is simple. First, use the following command:

forever start app.js

Note that app.js is the name of the script. We can also add a -a flag with the above command. This flag will ensure that log files get appended to the default log file located at forever’s default log file location. There are many other flags available that can be appended to the forever command.

We can also run multiple scripts at once by separating the script names with spaces. Here is an example:

forever start app.js index.js

When you start the processes using the above commands, you’ll receive some warnings and information about the file that it is processing.

After you start the script, you can list all the running processes with the list command, like so:

forever list

Here’s what the output looks like:

Forever List Output

In this output, we can see important details, such as the id of the process, the script name and location, the log file location, uptime duration, and more.

Starting and stopping scripts with forever commands

When we work in production servers, our priority is to run the script uninterruptedly even if some error occurs. Forever does this for us. Even if some error occurs, forever will restart the script for us. But there may be also cases, when we need to stop a script, maybe we need to push a new change or there is no use of the script, in such cases, to start or stop the process, the index ID can be really handy.

In the above image, you can see [0] in front of the uid. This is the index number of the script and can be used to kill or stop a process.

To stop a running script from the CLI, use stop, followed by any of the index id, script name, the uid, or the process ID (pid).

forever stop 0
// or
forever stop index.js
// or
forever stop ehbz
// or
forever stop 8196

It’s also possible to assign a unique name when starting a process. Using the tag --uid newapp will name the process newapp.

forever start --uid newapp index.js

We can also stop the process like this:

forever stop newapp

If multiple processes are running and you want to stop all of them at once, you can also use the command stopall, like so:

forever stopall

Restarting a process with forever is similar to stopping it. We replace the keyword stop with restart:

forever restart 0

We can use any index id, script name, the uid, or pid to restart a process. To restart all processes at once, we use restartall.

forever restartall

Configuring and executing a JSON file with forever

Up to this point, we have used CLI commands to run and manage the Node script. But with forever, we can also configure a JSON file where we can define all the necessary details and execute the JSON file. Let’s see an example.

{
  "uid": "app",
  "append": true,
  "watch": true,
  "script": "./index.js",
  "logFile": "./logs/forever.log",
  "outFile": "./logs/out.log",
  "errFile": "./logs/error.log"
}

Here, the uid is the unique name we are giving to the process. In our case, we are naming it app. The append flag does the same as -a flag; it appends logs. The watch flag watches for file changes.


Script is the script that we are running, and the logFileoutFile, and errFile are the location of the log file, output file, and error log file.

Multiple processes can also be set up into a single JSON file.

[
  {
    // App1
    "uid": "app1",
    "append": true,
    "watch": true,
    "script": "index.js",
    "sourceDir": "/home/nemo/app1"
  },
  {
    // App2
    "uid": "app2",
    "append": true,
    "script": "index.js",
    "sourceDir": "/home/nemo/app2",
    "args": ["--port", "4000"]
  }
]

We have defined two objects, App1 and App2, into a single array in a JSON file here. Running this single JSON file will run multiple processes.

Now, let’s talk about the forever-monitor module.

Using forever without CLI

The forever-monitor module helps run processes programmatically without using the CLI. Let’s assume we have a basic Express server that we want to run with forever-monitor. Here is the code for the server.


const express = require('express');
const app = express();

app.get('/', (req, res) => {
  res.send('Hello World!');
});

const PORT = process.env.PORT || 3000;

app.listen(PORT, () => {
  console.log(`Server is running on port ${PORT}`);
});

We have an index route that will show Hello World when we hit it. Now, to use forever-monitor package, we first have to install the dependency with npm i forever-monitor.

We’ll also have to create a separate file and define the options in it. In this example, I’ll name this file fm.js. In it, we have to import the forever-monitor module first. After importing the module, we’ll set up the options to run our app. For this tutorial, we’ll keep this very simple. Here is the code.


const forever = require('forever-monitor');

const child = new forever.Monitor('index.js', {
  max: 3,
  silent: false,
  uid: 'index',
});

child.on('exit', function () {
  console.log('app.js has exited after 3 restarts');
});

child.start(); 

The child variable holds the constructor created from the forever.Monitor method. This constructor takes in two parameters, the file name that we want to run, and an object with options. I’ve provided three options here.

The max: 3 key-value pair represents the maximum number of retries. If the silent flag is true, it silences the output from stdout and stderr in the parent process. The uid flag sets a name for the process.

In the child.on method, we are listening for an event called exit. When the event is triggered, we console log a message. Essentially, the process exits when the maximum number of retries is reached.

Finally, we start the process with child.start(). Now, running the script in the terminal with node fm.js will start our process.

This is how we can run scripts using forever without using the CLI.

Conclusion

Forever is a simple and helpful tool that enables devs to run Node scripts continuously. But it is also worth noting that, because of its simplicity, it lacks some features, so try it out and decide if forever or another tool like PM2 would best suit your use case. Happy hacking.

StaticImage

  import React , { useEffect , useRef } from "react" import { StaticImage } from "gatsby-plugin-image" impor...