https://www.wpbeginner.com/plugins/how-to-deactivate-all-plugins-when-not-able-to-access-wp-admin/
Method 1: Deactivate All WordPress Plugins Using FTP
For this method, you will need to either use an FTP client or the file manager app in your WordPress hosting control panel.
If you haven’t used FTP before, then you may want to see our guide on how to use FTP to upload files to WordPress.
First, you need to connect to your website using an FTP client or the file manager in cPanel. Once connected, you need to navigate to the /wp-content/ folder.
Inside the wp-content folder, you will see a folder called plugins. This is where WordPress stores all plugins installed on your website.
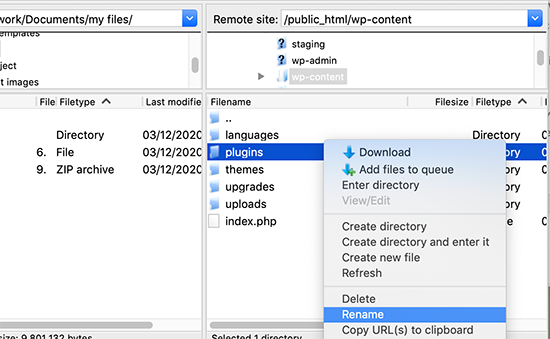
You need to right-click the plugins folder and select ‘Rename’.
Next, change the name of the folder to anything that you like. In our example, we will call it plugins.deactivate.
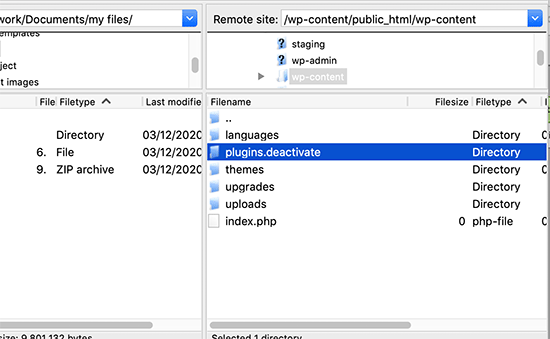
Once you do this, all of your plugins will be deactivated.
That’s because WordPress looks for a folder called ‘plugins’ to load the plugin files. When it does not find the folder, it automatically disables the active plugins in the database.
Usually, this method is used when you are locked out of your admin area. If the issue was with your plugins, then you should be able to log in to your WordPress admin area.
If you visit the Plugins » Installed Plugins page inside the WordPress admin area, then you will see notifications for all the plugins that have been deactivated.
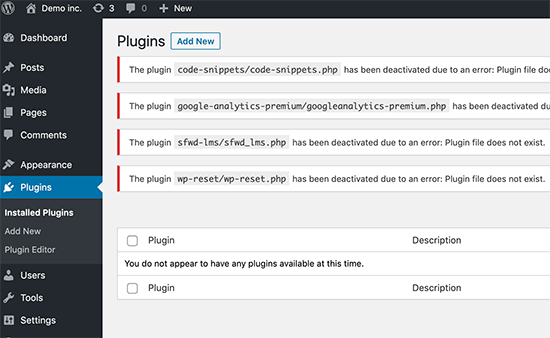
You will also notice that all your plugins have disappeared now. Don’t worry; they are all safe, and you can easily restore them.
Simply switch back to your FTP client and go to the /wp-content/ folder. From here, you need to rename the plugins.deactivate folder back to plugins.
Now, you can go back to the Plugins » Installed Plugins page inside the WordPress admin area and activate one plugin at a time until your site breaks again.
At this point, you will know exactly which plugin caused the issue. You can then delete that plugin’s folder from your site using FTP or ask the plugin author for support.
Method 2: Deactivate All Plugins Using phpMyAdmin
The FTP method is definitely easier, in our opinion. However, you can also deactivate all WordPress plugins using phpMyAdmin.
Important: Before you do anything, please make a complete database backup. This will come in handy if anything goes wrong.
Next, you will need to log in to your web hosting dashboard. In this example, we are showing you a cPanel dashboard. Your hosting account’s dashboard may look different.
You will need to click the ‘phpMyAdmin’ icon under the Databases section.

This will launch phpMyAdmin in a new browser window.
You will need to select your WordPress database if it is not already selected. After that, you will be able to see WordPress database tables.
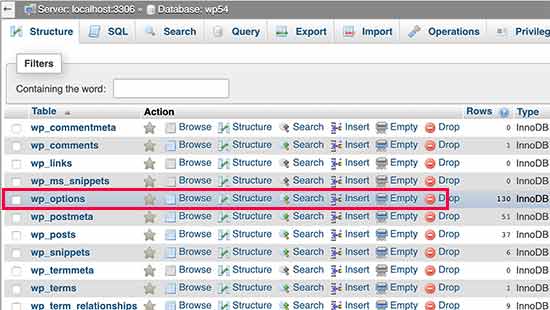
As you can see, all tables in the database have wp_ prefix before the table name. Your tables may have a different database prefix.
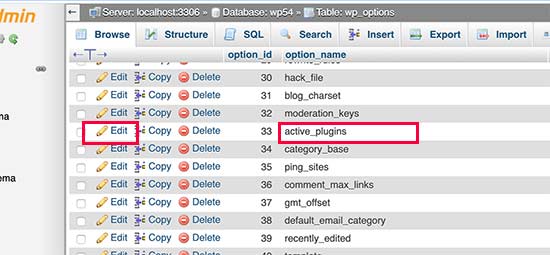
You need to click on the wp_options table. Inside the wp_options table, you will see rows of different options. Find the option ‘active_plugins’ and then click on the ‘Edit’ link next to it.
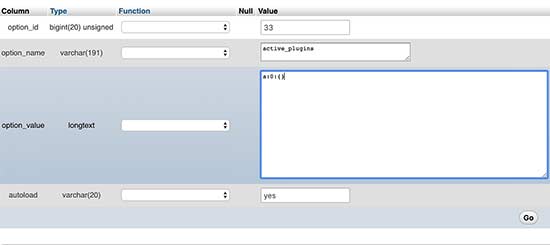
On the next screen, you will need to change the option_value field to a:0:{}.
Then, click the ‘Go’ button to save your changes.
You have successfully deactivated all WordPress plugins using phpMyAdmin. If a plugin was stopping you from accessing WordPress admin, then you should be able to log in now.
Không có nhận xét nào:
Đăng nhận xét