Webinar use one-click registration links for your events

 https://help.webinarkit.com/help/how-to-use-one-click-registration-links-for-your-events

Get the one-click registration link for your event

First go to your webinars dashboard. Click the "Get links" option for the event you want. From the pop-up, click "Embed forms & links". From the dropdown, click "One-click registration links".
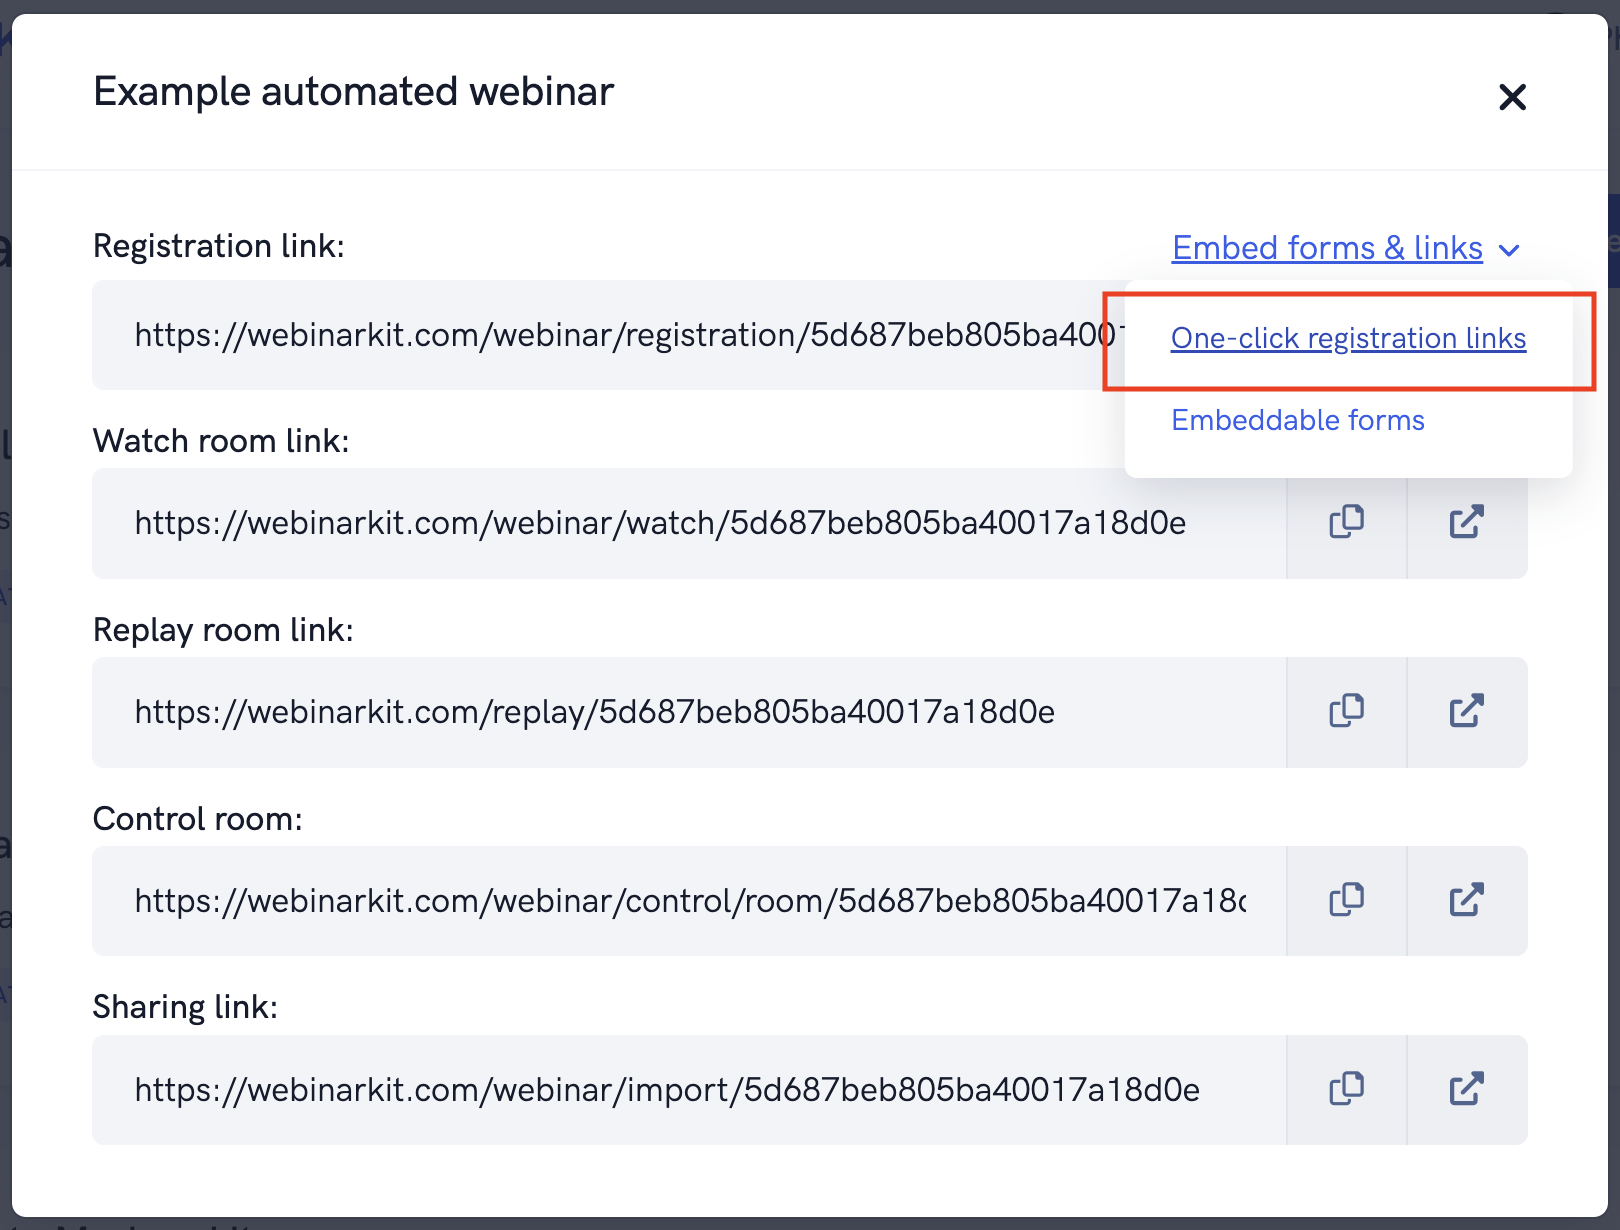
On the next pop-up that appears, select the date/time schedule that you want the one-click registration link to enroll registrants in. You can select any schedule you've added in your webinar settings. That means you can select "specific" session date/times, "ongoing" session dates/times (Example: The next session occurring on Friday at 3 PM), and just-in-time sessions. Instant watch sessions are also supported: Simply enable instant watch sessions in your webinar settings and the one-click registration link will override whatever date option is appended to the link.
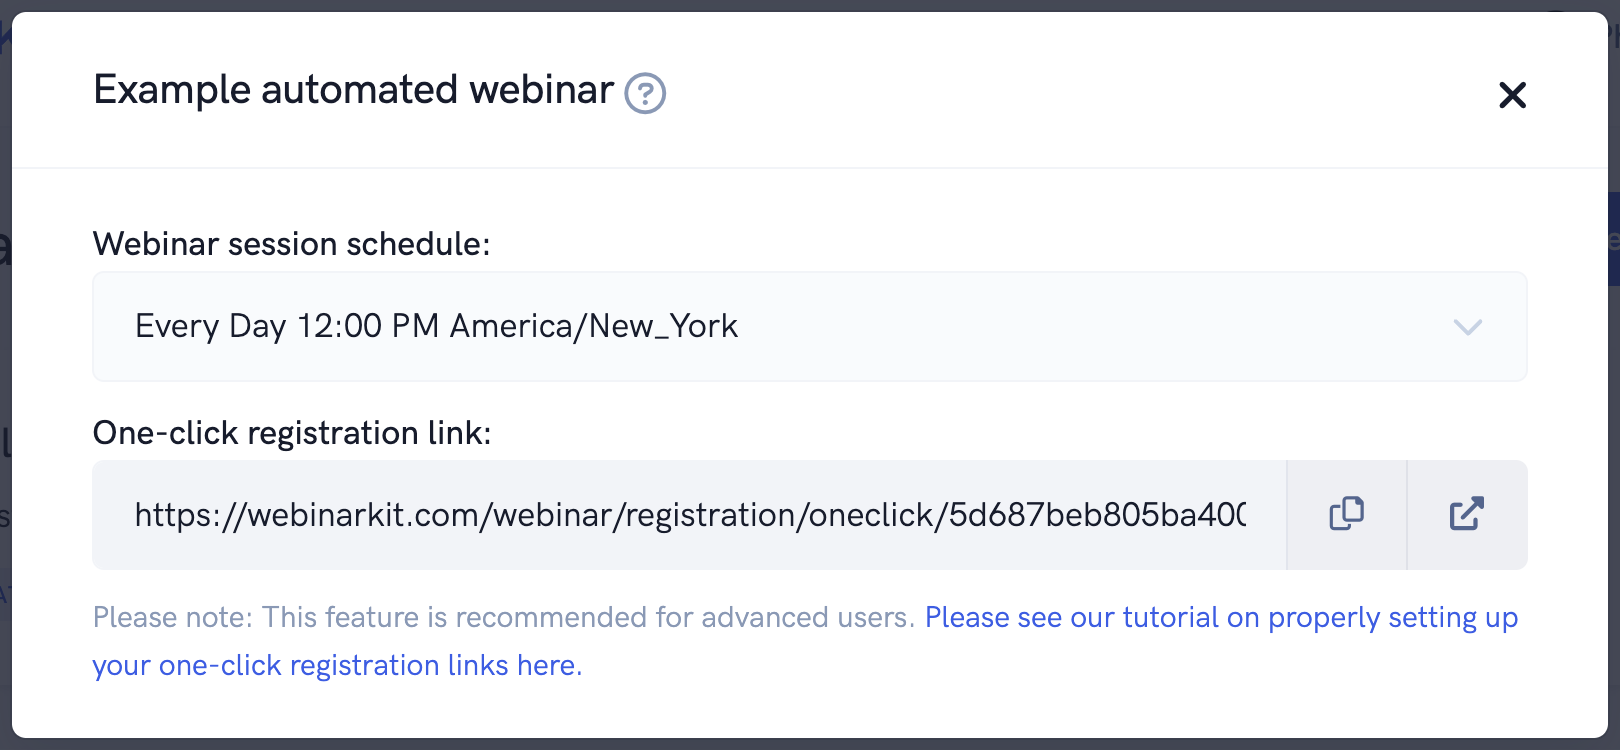
After selecting the schedule you want your one-click registration link to use, copy the link.

Add registrant details to your one-click registration link

Now that you have your link, you'll need to append the registrant details to it before using it. Below is a simple example where we simply append an email address to the end of the link. This will create a registration for the event using the email appended to the link:

https://webinarkit.com/webinar/registration/oneclick/5d687beb805ba40017a18d0e?date=jit_15&email=somecontact@email.com

Notice in particular the "&email=somecontact@email.com". When setting up your one-click registration links, you'll need to replace "somecontact@email.com" with the contact's email address. Let's use a CRM/email platform as an example of how this would work in practice.

One-click registration links support the following fields appended to the URL:

email
first_name
last_name
phone_number_country_code
phone_number
custom_field_1
custom_field_2
custom_field_3
custom_field_4
custom_field_5

Customizing your one-click registration link with your CRM or email platform

Say you're setting up an email broadcast inviting your email list to register for your upcoming event. In your email, you would use the CRM/email platform's personalization/merge features to append the contact's email address to your one-click registration link. Below you'll see a screenshot example of what this looks like in the email platform ConvertKit:

Notice how the "{{ subscriber.email_address }}" is used. This will be replaced by the contact's actual email address when that contact receives the email which is how WebinarKit will fill in the registrant's details for the event. Please note, every email platform/CRM is different so you'll need to replace the "{{ subscriber.email_address }}" with whatever your platform uses for personalization. Also, please note, it is best to URL encode the data appended to the one-click registration link. Many CRMs/email platforms support this as well so please consult their documentation on how to do this.

Some more examples:

A one-click registration link that creates a registrant with Joe Schmo as the name, somecontact@email.com as the email, and some custom field data:
https://webinarkit.com/webinar/registration/oneclick/5d687beb805ba40017a18d0e?date=jit_15&email=somecontact@email.com&first_name=Joe&last_name=Schmo&custom_field_1=Some+custom+field+data

A one-click registration link that creates a registrant with contact data dynamically passed in via a CRM/email platform:
https://webinarkit.com/webinar/registration/oneclick/5d687beb805ba40017a18d0e?date=jit_15&email={!email}&first_name={!name}

Examples of personalization on popular CRM/email platforms:

Active Campaign
first_name=%FIRSTNAME%
last_name=%LASTNAME%
email=%EMAIL%

Aweber
first_name={!name} or firstname={!firstname}
last_name={!lastname}
email={!email}

ClickFunnels
first_name=#FIRST#
last_name=#LAST#
email=#EMAIL#
phone_number=#PHONE#

ConvertKit
first_name={{ subscriber.first_name }}
email={{ subscriber.email_address }}

Get Response
first_name=[[name]] or firstname=[[firstname]]
last_name=[[lastname]]
email=[[email]]

Keap
first_name=~Contact.FirstName~
email=~Contact.Email~

MailChimp
first_name=*|FNAME|*
last_name=*|LNAME|*
email=*|EMAIL|*

Create Custom PopUp Component in React

 https://dev.to/g10dra/create-custom-popup-component-in-react-1o18

This blog is originally published at My Blog

Sometimes we fade up with using various modal box provided by Bootstrap or material or suppose we are not using any of these frameworks. then in such case we need to create our own component for Popups and Modal boxes, I created this for one of such requirement.

Before reading it if you want to take a look then try this demonstration

This will be a fully Reusable Component that we can Invoke from any of the component entire our project.

Step 1: Create a file named custom-popup.module.css with following code :

.overlay {
  visibility: hidden;
  opacity: 0;
  position: fixed;
  top: 0;
  bottom: 0;
  left: 0;
  right: 0;
  background: rgba(0, 0, 0, 0.7);
  transition: opacity 500ms;
}
.popup {
  margin: 70px auto;
  padding: 20px;
  background: #fff;
  border-radius: 5px;
  width: 30%;
  position: relative;
  transition: all 5s ease-in-out;
}

.popup h2 {
  margin-top: 0;
  color: #333;
  font-family: Tahoma, Arial, sans-serif;
}
.popup .close {
  position: absolute;
  top: 20px;
  right: 30px;
  transition: all 200ms;
  font-size: 30px;
  font-weight: bold;
  text-decoration: none;
  color: #333;
}
.popup .close:hover {
  cursor: pointer;
  color: #000;
}
.popup .content {
  max-height: 30%;
  overflow: auto;
}

@media screen and (max-width: 700px) {
  .popup {
    width: 70%;
  }
}

Step 2: Now create Popup Component with name CustomPopup.jsx with following code

import { useEffect, useState } from "react";
import popupStyles from "./custom-popup.module.css";
import PropTypes from "prop-types";
const CustomPopup = (props) => {
  const [show, setShow] = useState(false);

  const closeHandler = (e) => {
    setShow(false);
    props.onClose(false);
  };

  useEffect(() => {
    setShow(props.show);
  }, [props.show]);

  return (
    <div
      style={{
        visibility: show ? "visible" : "hidden",
        opacity: show ? "1" : "0"
      }}
      className={popupStyles.overlay}
    >
      <div className={popupStyles.popup}>
        <h2>{props.title}</h2>
        <span className={popupStyles.close} onClick={closeHandler}>
          &times;
        </span>
        <div className={popupStyles.content}>{props.children}</div>
      </div>
    </div>
  );
};

CustomPopup.propTypes = {
  title: PropTypes.string.isRequired,
  show: PropTypes.bool.isRequired,
  onClose: PropTypes.func.isRequired
};
export default CustomPopup;

This component using PropTypes, if you havent installed PropTypes in your project then do install that first using

npm install prop-types --save

Step 3: Invocation from another component

<CustomPopup
        onClose={popupCloseHandler}
        show={visibility}
        title="Hello Jeetendra"
      >
        <h1>Hello This is Popup Content Area</h1>
        <h2>This is my lorem ipsum text here!</h2>
      </CustomPopup>

It will need 3 props :
1: onClose – need a handler to do some activity after close
click in popup itself
2: show – pass the visibility of popup using boolean
3: title – provide the popup title

and Inside the you may pass any valid JSX that you want to render as content of popup

If you need a complete example how can we do utilise this PopUp Component then you may look into following code

import { useState } from "react";
import CustomPopup from "./CustomPopup";
import "./styles.css";

export default function App() {
  const [visibility, setVisibility] = useState(false);

  const popupCloseHandler = (e) => {
    setVisibility(e);
  };

  return (
    <div className="App">
      <button onClick={(e) => setVisibility(!visibility)}>Toggle Popup</button>

      <CustomPopup
        onClose={popupCloseHandler}
        show={visibility}
        title="Hello Jeetendra"
      >
        <h1>Hello This is Popup Content Area</h1>
        <h2>This is my lorem ipsum text here!</h2>
      </CustomPopup>
    </div>
  );
}


Thats it for this blog. you may reach out to me in case you have any doubts and suggestions please let me know in comments section.

URL parameters with React Router

 https://ui.dev/react-router-url-parameters

If you're reading this, you're probably familiar with the idea of function parameters. They allow you to declare placeholders when you define a function that will be set when the function is invoked.

function getProfile(handle) {
// `handle` is a placeholder
// for when `getProfile` is invoked
}
getProfile("tylermcginnis");
getProfile("cassidoo");

URL parameters solve a similar problem, except instead of declaring placeholders for a function, you can declare placeholders for a URL. In terms of React and React Router, this means what you render can be dynamic based on the "placeholder" portion of the URL.

Take Twitter for example. Instead of defining a route for every user on the platform, they can declare one route with a placeholder of the user's handle. The syntax would look something like this,

<Route path=":handle" element={<Profile />} />

Notice that the path has a : in front of it. That's how you tell React Router that this portion of the URL is the "placeholder". Instead of matching literally for twitter.com/handle, it's matching for the specific pattern.

Now whenever anyone visits a URL that matches the :handle pattern (/tylermcginnis/cassidoo/anything) , the Profile component.

Now the question becomes, how do you access the dynamic portion of the URL – in this case, handle – in the component that's rendered?

As of v5.1, React Router comes with a useParams Hook that returns an object with a mapping between the URL parameter and its value.

import * as React from 'react'
import { useParams } from 'react-router-dom'
import { getProfile } from '../utils'
function Profile () {
const [user, setUser] = React.useState(null)
const { handle } = useParams()
React.useEffect(() => {
getProfile(handle)
.then(setUser)
}, [handle])
return (
...
)
}

Now that we have the fundamentals out of the way, let's look at an example where we'd need to use URL parameters in an app – building a blog.

Our blog will be simple. On the / page we'll list out and link to all of our blog posts and we'll create a URL parameter for each post at /blog/:id.

With only that information, we can already render our Routes.

import * as React from "react";
import {
BrowserRouter as Router,
Route,
Routes,
} from "react-router-dom";
function Home() {
return ();
}
function Post() {
return ();
}
export default function App() {
return (
<Router>
<Routes>
<Route
path="/"
element={<Home />}
/>
<Route
path="blog/:id"
element={<Post />}
/>
</Routes>
</Router>
);
}

Next let's build out the Home component. As we learned earlier, this component will "list out and link to all of our blog posts". To do this, we'll need a way to get all of the ids and titles for our posts. Because this is a post about URL parameters, let's pretend we already had a helper function to give us this info - getPosts.

import * as React from "react";
import {
BrowserRouter as Router,
Route,
Routes,
Link,
} from "react-router-dom";
import { getPosts } from "./api";
function Home() {
const posts = getPosts();
return (
<div>
<h1>Posts</h1>
<nav>
<ul>
{posts.map(({ id, title }) => (
<li key={id}>
<Link to={`blog/${id}`}>{title}</Link>
</li>
))}
</ul>
</nav>
</div>
);
}
...

The biggest thing to note in the code above is the <Link> component. Notice we're linking to blog/${id} because that's the pattern that matches our Route we created previously -

<Route path="blog/:id" element={<Post />} />

The final thing we need is to build out our Post component that gets rendered when a user visits a URL that matches the blog/:id pattern. To do this, we'll need to first, get the id of the post the user is visting (via the URL parameter) and second, use that id to get the contents of the post.

To get the id of the post (via the URL parameter), we can use React Router's useParams Hook. To then get the post's content, we'll pretend we have a getPost function we can use.

import * as React from "react";
import {
BrowserRouter as Router,
Link,
Route,
Routes,
useParams,
} from "react-router-dom";
import { getPost, getPosts } from "./api";
function Post() {
const { id } = useParams();
const post = getPost(id);
return (
<div>
<h1>{post.title}</h1>
<p>{post.content}</p>
</div>
);
}

To recap, you can think of URL parameters similar to how you think of function parameters. However, instead of creating a placeholder for a function value, you're creating a placeholder for a portion of a URL.

Using React Router, when you want to create a Route that uses a URL parameter, you do so by including a : in front of the value you pass to Route's path prop.

<Route path=":id" element={<Invoice />} />

Finally, to access the value of the URL parameter from inside of the component that is rendered by React Router, you can use React Router's useParams Hook.

import { useParams } from 'react-router-dom'
export default function Invoice () {
const { id } = useParams()
...
}

anti-pattern là gì

  Trong công nghệ và lập trình, Anti-pattern (mẫu phản diện) là những giải pháp bề ngoài có vẻ hiệu quả để giải quyết một vấn đề phổ biến, ...