Introduction
A hostname is simply the name a server goes by on a network. Setting a unique hostname is an excellent way to quickly find and identify different servers on your network.
There are three 3 types of hostnames.
- The static hostname is the most important one, and it’s stored in the /etc/hostname file. This hostname is used among machines to identify a particular server.
- The pretty hostname got its name because it allows for more characters and punctuation. It’s more user-friendly, but since it uses non-standard characters, it is not permitted for machine code. The pretty hostname is stored in the /etc/machine-info directory.
- The transient hostname is one maintained in the Linux kernel. It is dynamic, meaning it will be lost after a reboot. This approach might be useful if you have a minor job requiring a temporary hostname, but you don’t want to risk making a permanent change that might be confusing.
Prerequisites
- Server running CentOS 7
- Access to a user account with root privileges
- Terminal window (Menu > Applications > Utilities > Terminal)
- A text editor, like Vim
How to Change Centos Hostname
Step 1: Check Existing Hostname
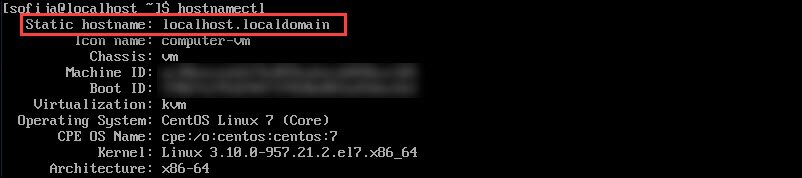
Before you start, it is advised to check what your current hostname is. Type the following command in the console to find out:
hostnamectlThe output should return the static hostname, as well as a list of other information about your network configuration and operating system.
Step 2: Set a New Static Hostname
As CentOS 7 only allows Fully Qualified Domain Names (FQDNs), double-check the hostname you plan to use.
Acceptable values include:
- Lower-case letters a to z
- Numbers 0 to 9
- Periods and hyphens
- Hostnames must be between 2 and 63 characters
- Hostnames must start and end with a number or letter
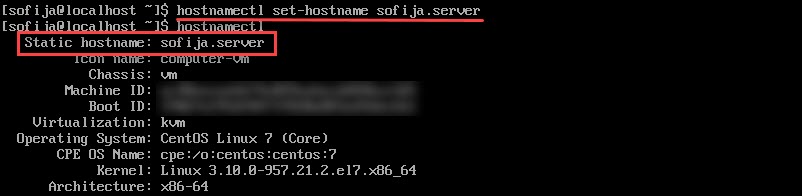
Type in the following command in the terminal:
hostnamectl set-hostname my.new-hostname.serverNote: Make sure to replace my.new-hostname.server with your chosen hostname.
Step 3: Check the Hostname
Next, verify the hostname by using the following command again:
hostnamectlThe console should display the new hostname.
Step 4: Edit the /etc/hosts File
Start by opening the hosts file by typing:
sudo vim /etc/hostsIn the text editor, look for the line that begins with 127.0.0.1 (the IP address that refers to the system you are working on). It should read:
127.0.0.1 localhost localhost.localdomain localhost 4 localhost4.localdomain4 old.hostnameChange the entry old.hostname to my.new-hostname.server – and spell it the same as in Step 2.
Save the file and exit.
Note: To learn more about hosts file, check out our article on how to edit hosts file on Linux, Windows and Mac.
Step 5: Reboot and Check CentOS 7 machine hostname
Restart your system. Open a console window, and run:
hostnamectlIt should display your new hostname.
You can also use your text editor to open and verify your /etc/hostsfile. It should still have your new hostname listed.
Step 6 (Optional): Using a Pretty Hostname
To use a "pretty" hostname type the following command:
hostnamectl set-hostname "My Boss's Hostname"Make sure you have the quotation marks.
Once that completes, check the hostname:
hostnamectl statusThe console should return a list of information. Check the Static hostname and Pretty hostname lines – they should look like this:
Static hostname: mybossshostnamePretty hostname: My Boss's HostnameBy putting the hostname in quotes, you’re telling the system to use the complex characters inside the quotes as a pretty hostname.
This enables you to avoid character restrictions for static hostnames.

But you still need a FQDN hostname for the machine to understand. Fortunately, CentOS is smart enough to remove or change any unacceptable characters and render the static hostname automatically.
Step 7 (Optional): Setting a Transient Hostname
Fist, open the console and type the following:
sudo hostnamectl -transient set-hostname temporary.hostnameYou can check the hostname in the same way you did earlier, with the hostnamectl or hostnamectl status command.
This change will last until you reboot the machine.
You can use this command with any type of hostname (Static, Pretty, or Transient) as an option with the double-hyphen.
Just use the double-hyphen to indicate what you want:
sudo hostnamectl --prettyset-hostname "Pretty Hostname"or
sudo hostnamectl --staticset-hostname temporary.hostname
Không có nhận xét nào:
Đăng nhận xét